Service Examples
Within this section will follow a simple learn by doing course around the development of a possible set of services, using Developer Studio 2.0.
The objective will be the introduction to the use of the paradigm of coding of GreenVulcano directly applied to a set of practical examples: first we’ll see an already complete service, then use what was learnt by applying on the first service from scratch.
Introduction example: the ECHO service
After having a first look in the Quickstart section, we can finally see how the ECHO service (particularly the normalize function) operates and reaches its final goal. The definition of the components involved in the process are usually added, and therefore present, inside the Vulcon side of the Developer Studio.
If we drill down with button Services, then ECHO - Service, then the Flow section, the complete list of nodes used by the operation normalize will be shown: let’s analyze them, by following the original data flow. Within every GreenVulcano flow the execution begins with the green Start node: its execution will carry on the input given to the operation at the moment of its initial start.
Since normalize is an on-demand kind of operation, its execution needs a mandatory input data, to be filled in inside the GVConsole Testing section, inside the Body edit field, before pressing the Run button: let’s mentally use the string tHIS IS A NORMALIZED STRING.
So, when properly filled, such value will be injected directly inside the first-node: such first node needs also to be filled in inside the Vulcon Flow section as an indication of “what is the first node to be executed after the Start node”.
In our normalize flow such node is the check_input: this GVNodeCheck type of node provides a conditional choice check, based on the input provided (the string we imagined few rows above).
As was described in the Quickstart section, an input string can either start with an upper character or a down character.
So, by declaring such 2 new conditions in the Conditions - Conditions drill down section it would be possible to manage the possible input possibilities.
The FirstCaseIsUpper condition is a javascript condition, which is written in javascript to ensure more flexibility and coding language power.
If we click on the js - Script section of it we’ll be able to see the javascript coding associated to the condition: simply click on the Text - > Script of the Properties section to display it.
Objective of a conditional choice is to return a boolean value at the end of the javascript condition: therefore, the FirstCaseIsUpper condition should return a true value when the first character of the input string is a downcased character.
Thus, getting back to our hypothetical input “tHIS IS A NORMALIZED STRING”, the script would ultimately return a true value, since of its first character peculiarity: in terms of flow execution from the check_input conditional node would move on towards the FirstCaseIsUpper condition, which is the toupper_js node.
Analogously, the FirstCaseIsLower condition triggers when the first character of the input string is a downcase character, moving the flow towards tolower-js.
A default condition, expressed by the black connection, leads to the very same tolower-js, since all non-alphabetical characters are by definition downcased characters: this condition covers all the remaining possible cases (this is why it is often called “otherwise case”).
Actually, there’s one last possibility to cover: the unforeseen.
If an unexpected kind of input is injected into the flow (non-standard characters, for example), the red connection condition triggers, leading to the invalid-op-js, which is just meant to return an error message as a final output.
The 3 central ChangeGVBuffer nodes are meant to manipulate the final outcome string, basing it on the conditional choice applied: toupper-js simply manipulates the input string to be outputted as uppercased, tolower-json the other hand downcases it and invalid-op-js simply outputs a standard error string. Their javascript code can be looked into by clicking their drilldown nodes button, then ChangeGVBuffer – ChangeGVBuffer and finally in the script section of the TEXT property.
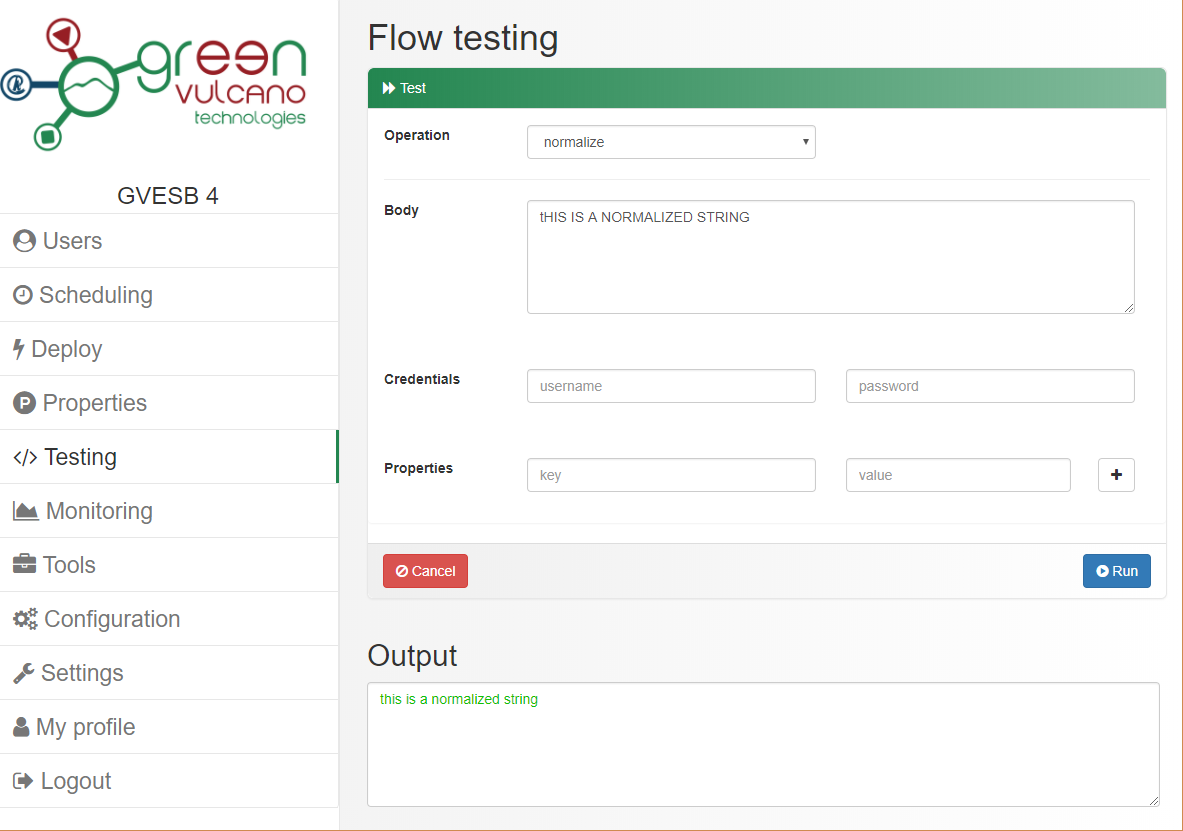
As a final step, whatever path the flow followed (the upper one, in our input case), the final node reached will be toupper-js-end, outputting the data from the ChangeGVBuffer used at runtime, which will be a downcased “this is a normalized string” string in our case.
Such output string will be returned inside the Output of the GVConsole, in the testing section. From here our reader can actively use the Developer Studio 2.0 Debugger to test the service functionality: from here simply follow the Debugger section of this documentation.
Our first service from scratch: a simple report
Arrived at this point the user should be able to find its way through Developer Studio 2.0, having scratched the surface of the main concepts around a service flow design: from here it’ll all be new components addition to be used in new applications.
First one will be a simple report service: this service will be able to return an Excel file report with aggregated data taken from a database, and make it available to the user via web browser.
Sounds complicated, right?
Not for GreenVulcano 4 and its powerful framework.
Within this first example we’ll see 2 new important additions:
- database access within GV
- service exposition as a WebService, to make it use as an on-demand service
Technically speaking, a report is basically a query to the data storage (in this case a DBMS), in order to get the required informations.
The user will request this report file by filling in a proper URL into its browser.
In order to define and use a service like this we’ll need the following prerequisites:
- a web browser, to call the service and obtain the final report file
- a database, with a table set up with at least 1 row present
- Karaf with GV, with the OPS4J Pax JDBC database adapter installed
As an example we could use a generic “EMPLOYEES” table, with the usual ID, NAME and SALARY as columns: nothing fancy for our report.
Setting up a DB connection for our service
To query the database we’ll need make a DB connection available to our service: in order to do that we need to Set up a new DB connection set up a new DB connection, pooled by the “OPS4J Pax JDBC” GV plugin.
Name the new connection with something like “simpleReportConnection”, which we’ll use inside the service implementation.
Right before starting with the raw service development, let’s see how make the to-be service available as an external Webservice, hosted by GV 4 ESB.
Service implementation
The simple report service will be synchronous: when a request will trigger the GVAdapterHttp, the service will be activated at once and the service itself will respond with an encoded data content (the Excel report file), which the browser will be able to save as a file.
So, the service will be developed within this bounds: following the Start node, we will extract such report data and make it available to the End node, giving it back to the browser.
Thanks to GV, this whole extraction part can be obtained in one single step, or one node, in GV terms: the operation excel-call allows us to extract the information we need, and output them into an Excel encoded format.
In order to do that let’s start by creating a System inside the Vulcon's Adapter section, which will contain the factories capable to instance our flow nodes.
Since we’re doing a report kind of service we can ID this new System “SYSTEM_REPORT”, so new eventual services might appeal to this existing System.
The same kind of reasoning might apply to the Channel we’re about to add to our System: so let’s add a new Channel with ID “CHANNEL_REPORT”.
From inside this new channel let’s add our excel operation: right mouse button over the Channel and let’s Insert After a new "excel-call" object.
This type of operation relies on the SQL language to perform the needed query, so we’re going to perform a DB configuration and a query addition within the excel-call operation: let’s add a GVExcelReport object to our operation, with name “simpleReport”, and as jdbc-connection we use the connection set up one paragraph above, with the proper use of the placeholder
xmlp: so we type “xmlp”.
Inside the Sheet object we type down the name of our report under title property: “A simple report on our Company employees”, an ID equal to “0” and a “report” under the name property.
The operation configuration is almost set: under the statement object let’s set again an ID equal to “0”, the type as “select”: the statement property will simply need to contain a straightforward SQL select query, something like:
SELECT ID, NAME, SALARY from EMPLOYEES order by ID
which will ask the DB for the whole EMPLOYEES result set, ordered by ID.
Basically, the simpleReport service will return a list of the employees working for the Company.
The operation excel-call is now set and ready to be used by a GVOperationNode, which by definition is able to implement an operation type of object set.
But first, as a first node, let’s deploy an End kind of node from the Palette section of our Developer Studio, and simply drag’n drop it over the Flow Designer canvas, right next to the Start node: then when prompted fill in the ID with “reportEnd”, and as output “outputReport”.
Next, let’s get the node of the type "Call" from the Palette section of our Developer Studio, and simply drag’n drop it over the Flow Designer canvas, right next to the Start node.
When prompted by the new Node Configuration window, fill the following needed infos:
- id-system:SYSTEM_REPORT
- operation-name: simpleReport
- id: extractReport
- input: input
- next-node-id: End
Last step, we need now to “tell” to the extractReport node that the output it’s gonna prepare is an encoded Excel file, and the filename to create it.
Let’s create a ChangeGVBufferNode with:
- id: "prepareName"
- input: input
- next_node_id: extractReport
then add to it a sub-object ChangeGVBuffer and add to them a PropertyDef with the following characteristics:
- name: HTTP_RESP_FILE_NAME
- value: simpleReport_timestamp.xls
and another PropertyDef with the following:
- name: HTTP_RESP_CONTENT_TYPE
- value: application/vnd.ms-excel
With these last 2 we configured the excel-call type of node to output the wanted Excel file report, with the name “simpleReport[date].xls”, to be returned to the web browser as a download. We’re ready! We can now save the project with our Dev Studio 2.0, export and deploy it on our GVConsole, ready to be used from the Testing section.
Service exposition
By definition, a GV service operation execution is independent from its meaning of execution, meaning that a service like simpleReport can be triggered by all the types of available forwarding technologies: e.g. JMS dequeuing, WebService client request, scheduling, etc.
So how are we going to activate our simpleReport service?
As we introduced, our forwarding will be triggered by a web browser call, which is basically an HTTP GET request: so the answer to our question is straightforward.
We’ll make the service operation available hosting it as an HTTP WebService, by the very same GV 4 ESB.
The GV 4 ESB component able to host a webservice is the GVAdapterHttp, which can be configured adding a GVAdapterHttpConfiguration, under Vulcon, Adapters: under the GVAdapterHttpConfiguration drill down section, simply add an ActionMappings new voice of RESTActionMapping type. This is done by clicking with the right mouse button over the ActionMapping and Insert After -> RESTActionMapping.
A new RESTActionMapping row will appear, with no name nor data configured: by clicking on this new row we can fill in the missing properties:
- RespCharacterEncoding: UTF-8
- RespContentType: application/json
- Action: /ECHO/*
- enabled: true
this few infos simply confirms that the service will host a REST service on the “ECHO” URL context path, and the enabled flag simply does what it seems, enabling the hosting of this mapping.
By definition, a mapping binds 2 concepts or resources: in this case we will bind the URL context exposed to the running of the report service.
Each time a user will reach the URL like
http://[GreenVulcanoESB IP number]:[port]/ECHO/simpleReport
a Excel report file will be download-ready onto the browser used.
So, the last part to add the exposition of the operation requested: the “simpleReport” part filled into the URL requested will lead to our new service operation (not yet added, we’ll get there soon).
Doing a right mouse button click under the OperationMappings section we may add a Insert a new Mapping+ : the new object added should have the following properties to fill in:
- system: SYSTEM_REPORT
- method: GET (since the browser request uses an HTTP GET)
- pattern: /APPLICATION=ECHO/Action=simpleReport
- service: simpleReport
The blank parts will be filled in once we have implemented the service operation simpleReport.
A general remainder about a service activation:
whatever is the meaning to activate a service, it can always be also run by the GVConsole, within the Testing section, provided that a proper input/properties are set right before the Run button pressing.
In this particular case though the final output would be putted inside the output memo object of Testing and not in a target file, since we meant the service to be activated by an HTTP GET request.
A more comprehensive example
[to be completed]