Event Driven Push Notification - Step 3
Description
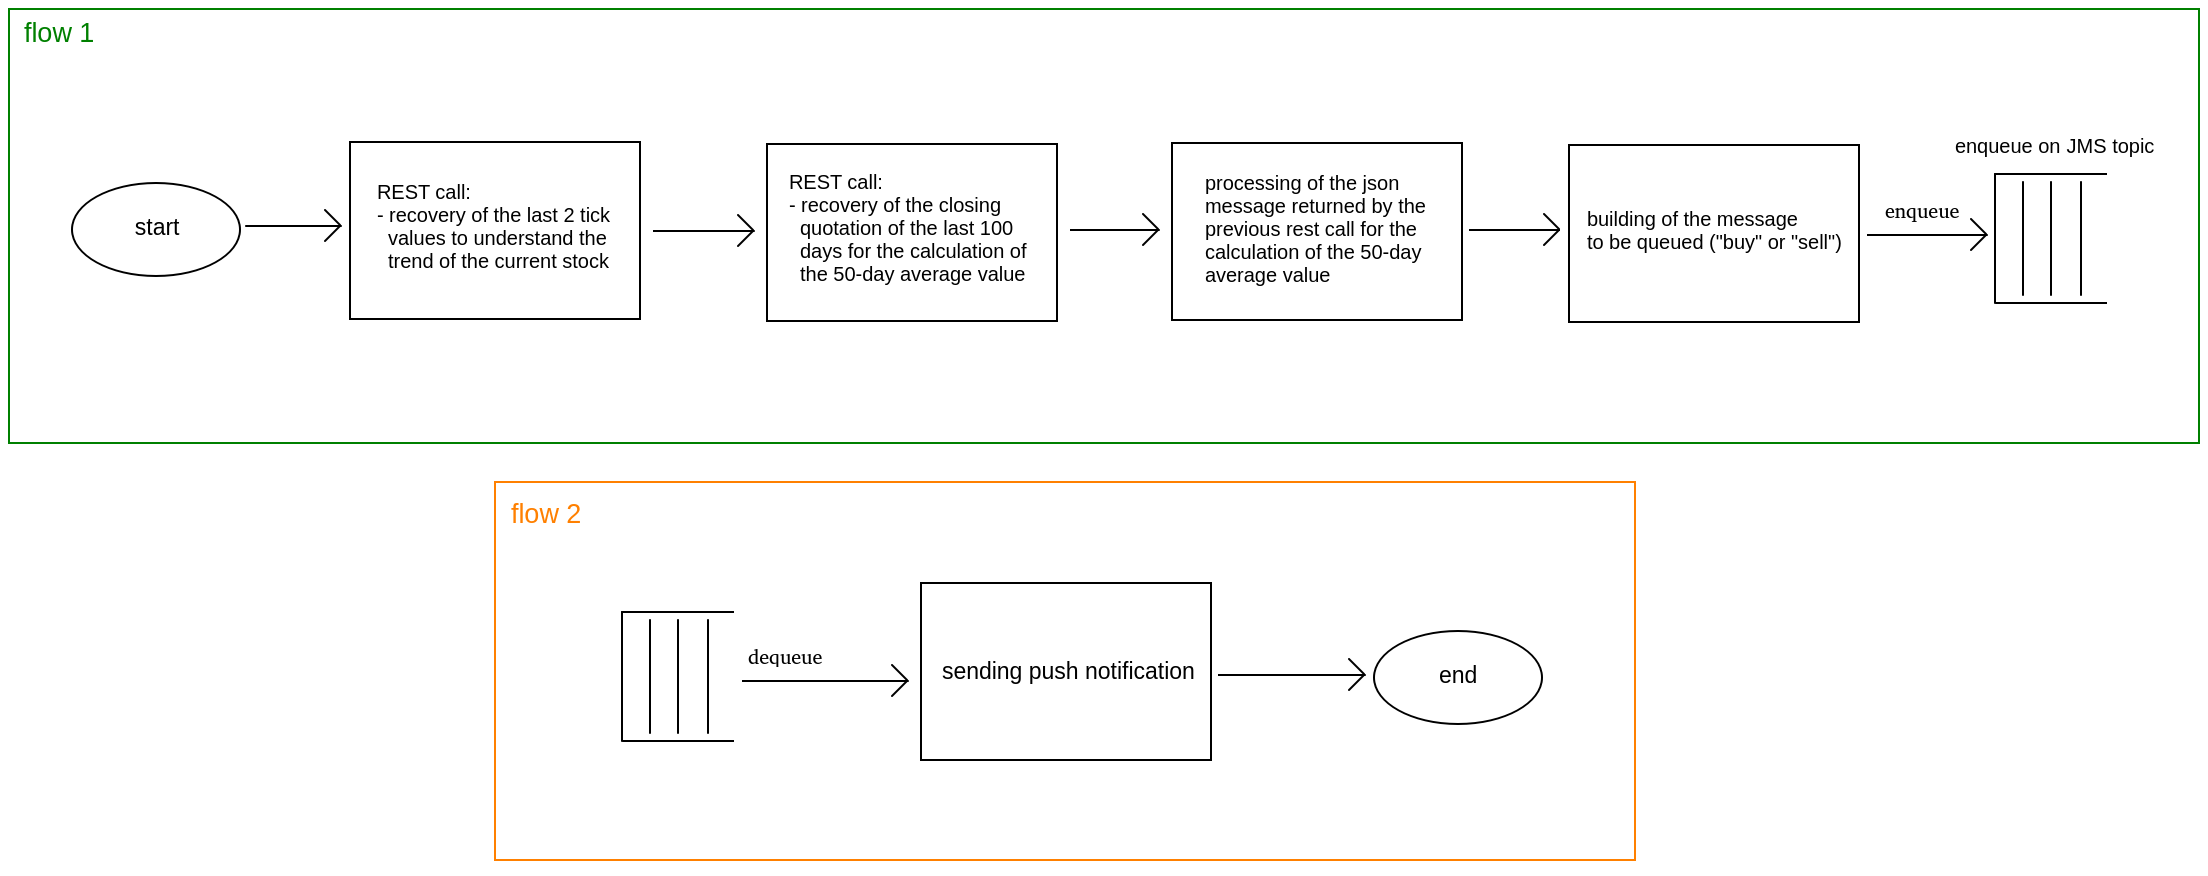
In this Example we are going to modify the previous exercise by making it asynchronous using a JMS topic.
System setup
We have to set up a new System to use JMS enqueue operation (also used for topics publishing):
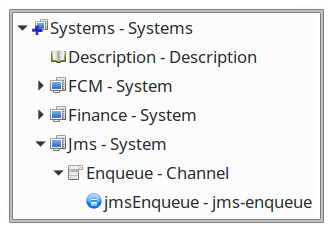
rest-call: jmsEnqueue
This System is able to publish the message on the specified topic.
Create a new System called “Jms” and a new Channel called “Enqueue” (or publish):
- Insert into the channel a jms-enqueue operation and name it jmsEnqueue (or jmsPublish)
- Now set jmsEnqueue’s attributes:
- acknowledge-type = auto-acknowledge
- decorate-message = false
- delivery-mode = non-persistent
- destination-type = topic
- priority = 4
- ref-dp = objectToTextMessage
- transacted = false
- type = enqueue
- connection-factory = osgi:service/jms/outboundConnection
- destination-name = TEST.TOPIC
- name = jmsEnqueue
N.B: Check that your connection-factory is correctly configurated using the command jndi:names in the Karaf console. To configure it go to JMS Setup section.
For this tutorial you have to configure the following connections:
karaf@root()> jms:create -t activemq -u gvadmin -p gvadmin --url tcp://localhost:61616 inboundConnection
karaf@root()> jms:create -t activemq -u gvadmin -p gvadmin --url tcp://localhost:61616 outboundConnection
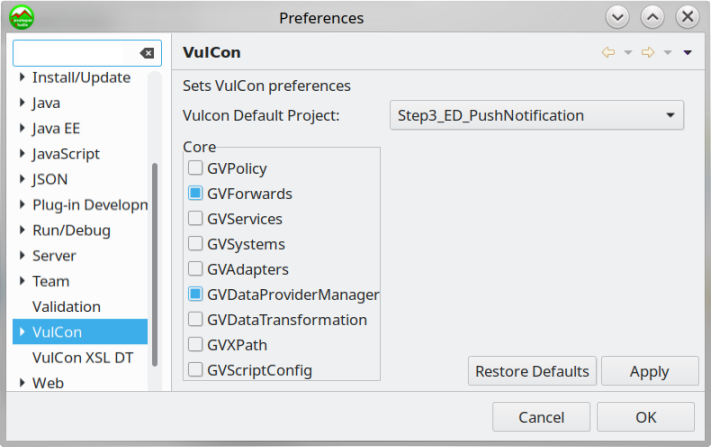
Once configurated, the new system allows you to send a message in the JMS topic TEST.TOPIC. Now we have to configure a JMS Forward that can provide to get the message from the topic and start up a flow to handle the event. By default the forwards view is disabled in core section, but you can enable it by going to Window -> Preferences -> VulCon and enable GVForwards in the core group.
Now create a Forward configuration like the one described in the xml below to trigger the Send operation (this will be the result in GVCore.xml):
<ForwardConfiguration enabled="true" flow-service="PushNotification"
                forwardName="Send" full-debug="true"
                name="financePushNotification" ref-dp="textMessageReader">
                <ForwardDeployment clientId="clientSub"
                                connection-factory="osgi:service/jms/inboundConnection"
                                destination="TEST.TOPIC" destination-type="topic"
                                transacted="false" transaction-timeout-sec="30"/>
</ForwardConfiguration>
Finally configure two DataProviders in order to handle data in the topic:
- objectToTextMessage (JMSTextMessageDataProvider): this data provider convert a generic object to a text String.
- textMessageReader (StringDataProvider): this data provider return a text String from a generic object.
<GVDataProviderManager name="GVDP" type="module">
   <DataProviders>
      <JMSTextMessageDataProvider class="it.greenvulcano.gvesb.gvdp.impl.JMSTextMessageDataProvider"
                                  name="objectToTextMessage" type="dataProvider">
         <Field direction="OUT" key="output" type="field">
            <Expression type="ognl">setText(#input.object)</Expression>
         </Field>
      </JMSTextMessageDataProvider>
      <StringDataProvider class="it.greenvulcano.gvesb.gvdp.impl.StringDataProvider" name="textMessageReader"
                          type="dataProvider">
         <Field direction="INOUT" key="buffer" type="field">
            <Expression type="ognl">object.getText()</Expression>
         </Field>
      </StringDataProvider>
   </DataProviders>
</GVDataProviderManager>
Flow setup
Once the System Jms is created we can start to modify Threshold flow:
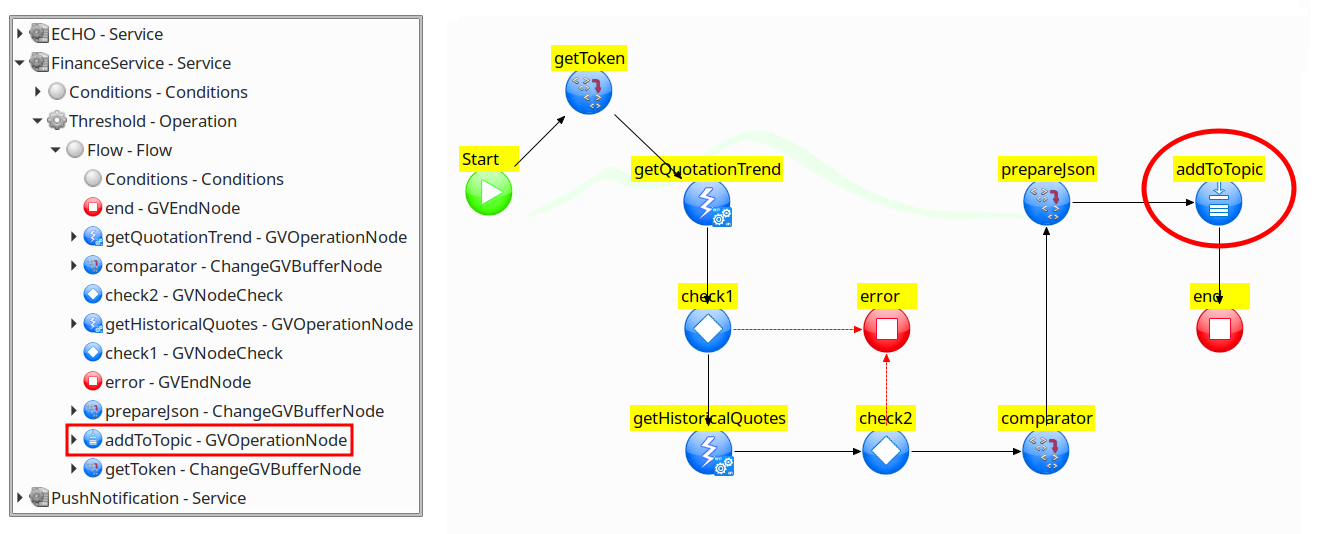
addToTopic (GVOperationNode)
This node has the task to send the json file in the buffer to TEST.TOPIC topic:
- id = addToTopic
- id-channel = Enqueue
- id-system = Jms
- input = input
- next-node-id = end
- operation-name = jmsEnqueue
- op-type = enqueue
- InputServices (InputServices)
- toString (script-service)
-
toString (script-call) +Script (Script)
  var str=new java.lang.String(data.getObject());
  data.setObject(str);
-
- toString (script-service)
Testing with GV Console
Now you are able to test your VulCon Service from the GV Console® once exported the configuration.
So, let’s start GreenVulcano® ESB, access to the GV Console and deploy your Vulcon project setting your server key.

Once the configuration is deployed you can finally test it. Go to Execute section end select Threshold operation. To send a notify you have to insert a Json string. The device token is the code that you can find in the web app:
{ "fcm_device_token":"YOUR_FCM_DEVICE_TOKEN" }
Now you can reiceve notifications by your Android App:
Note: In case of error or exceptions you can check the file GVCore.log situated in the folder GV_HOME/data/log/.
Download
Here you can download the configuration: